
What is Caching in WordPress?
Caching is used to speed up your website by reducing the load on your server. It serves content at blazing speeds while delivering the latest content to your readers. It will make your website work much faster and effectively, as it serves content from the cache instead of generating it again, which can take a toll on your server.
Caching is a technique used by browsers to store web pages and resources locally so that they can be accessed quickly the next time they are requested. This can speed up the browsing experience for your users and improve the performance of your website.
When a page is cached, the content is saved within the user’s browser rather than checking your server every time. When on subsequent page requests, Google will first try to find the page in its cache. This saves time and bandwidth.
Why Clear Cache in WordPress?
There are a few reasons why you might want to Clear Cache in WordPress website. One reason is that you may have made changes to your website and you want the changes to be visible to your readers. Another reason is that you may have updated a plugin or theme and the changes aren’t showing up.
Clear Cache in WordPress website can also help you recover from some known issues and bugs. If you recently changed themes, clearing the cache may help you resolve any layout issues.
Method 1: Clear Your Web Browser Cache
The first step is to clear your web browser’s cache. This will delete all of the cached files from your browser, including images, JavaScript and even the front-end code of your website. This may be a quick way to get your site back, but keep in mind that the cache will be rebuilt as your readers access your pages.
Chrome:
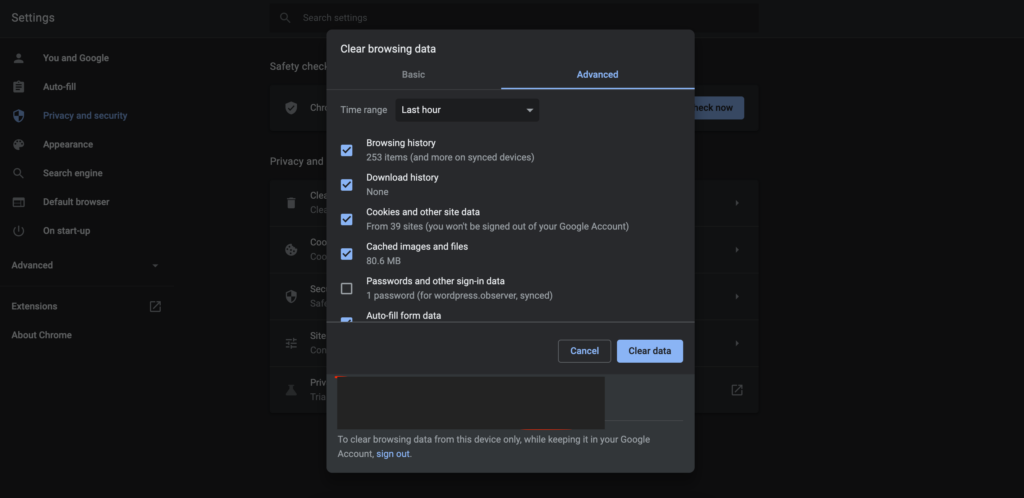
1. Open Chrome and go to the Settings menu.
2. Scroll down to the ‘Advanced’ section and click on ‘Clear browsing data’.
3. You can then select which part of your browser’s storage you’d like to clear up.
4. Once the process is complete, click on ‘Close’.
Firefox:
1. Open Firefox and go to the Menu bar.
2. Select ‘History’ and then ‘Clear Recent History’.
3. You can then select which part of your browser’s storage you’d like to clear up.
4. Once the process is complete, click on ‘Close’.
Internet Explorer:
1. Open Internet Explorer and go to the Tools menu.
2. Select ‘Delete Browsing History’.
3. In the new window, you can then select which part of your browser’s storage you’d like to clear up.
4. Once the process is complete, click on ‘Close’.
Safari:
1. Open Safari and go to the Edit menu.
2. Click on ‘Empty Cache…’.
3. Once the process is complete, click on ‘Done’.
Method 2: Clear Cache in WordPress- Caching Plugin
The second method is to clear your cache through a caching plugin. There are many plugins available that can clear your website’s caches. If you do not have a caching plugin installed already, you can search for one in your WordPress Plugin directory.
We recommend WP Super Cache or WP Rocket
WP Super Cache:
1. Login to your WordPress Admin Panel and navigate to ‘Settings -> WP-Super-Cache’.
2. Under the ‘Clear Cache’ tab, you can then select which parts of your cache you’d like to clear.
3. Click on ‘Save Changes’ and you’re done.
WP Rocket:
1. Login to your WordPress Admin Panel and navigate to ‘Settings -> WP Rocket’.
2. Under the ‘Advanced’ tab, you can then select which parts of your cache you’d like to clear.
3. Click on ‘Save Changes’ and you’re done.

Method 3: Clear Cache in Your WordPress Hosting Control Panel
The third method is to clear your cache through your WordPress hosting control panel. This is generally done if you are not able to access your WordPress Admin panel or if you do not have a caching plugin installed.
1. Login to your control panel and navigate to ‘Tools -> Clear Cache’.
2. Select which parts of your cache you’d like to clear and click on ‘Clear Cache’.
3. You’re done !
If you’re still having issues with your website after clearing the cache, don’t hesitate to contact [email protected] . We hope that this helps with clearing any website related issues!
Clear Cache in WP Engine
If you are a subscriber to WP Engine and using the EverCache caching plugin, you have the ability to clear your entire cache with a single click.
1. Login to the WP Engine Console.
2. Click on ‘Cache’.
3. Under ‘Cached Objects’, click on ‘Clear all cached objects’.
4. You will see a pop-up confirming your decision to clear the cache. Click on ‘Ok’ to proceed.
5. You will see a message confirming that the cache has been cleared. Click on ‘Close’ to dismiss.
Clear Cache in SiteGround
If you are a subscriber to SiteGround and using the SG CachePress caching plugin, you have the ability to clear your entire cache with a single click.
1. Login to the SiteGround Console.
2. Click on ‘Cache’.
3. Under ‘Objects’, you will see a list of all the cached objects on your website.
4. To clear the cache, click on the ‘X’ next to the object you’d like to delete.
5. You will see a message confirming that the object was deleted and how it increased your website’s speed and performance. Click on ‘Ok’ to proceed.
6. You will see a message confirming that the object was deleted and how it increased your website’s speed and performance. Click on ‘Close’ to dismiss.
Clear Cache in Godaddy
If you are a subscriber to Godaddy and using the Godaddy caching plugin, you have the ability to clear your entire cache with a single click.
1. Login to the Godaddy Console.
2. Click on ‘Manage’.
3. You will see a list of your websites. Select the website you would like to clear the cache for.
4. Click on ‘Settings’.
5. Then click on ‘Clear Cache’.
6. A message will pop up asking if you are sure you want to clear the cache. Click on ‘Yes’.
7. You will see a message confirming that the cache has been cleared. Click on ‘Close’ to dismiss.
Method 4: Clear Your WordPress Firewall Plugin Cache
If you are using a firewall plugin, such as Wordfence or Cloudflare, you may need to clear the cache for that plugin as well.
First, login to your firewall plugin control panel. For Wordfence, navigate to ‘Tools -> WP Security’ and then click on ‘Clear Firewall’. For Cloudflare, navigate to ‘Dashboard -> My Settings -> Advanced’ and then click on ‘Purge all caches’.
Leave a Reply